

Django-2: Installation, Configuration and Create First Django Project
Django Tutorial Outline:-
- Django-1: Learn Django Tutorial Getting Started
- Django-2: Installation, Configuration and Create First Django Project
- Django-3: Create First Django App
- Django-4: Learn about Django Template Language (DTL)
- Django-5: Django Template Language (DTL)-Variables
- Django-6: Django Template Language (DTL)-Tags
- Django-7: Django Template Language (DTL)-Filters
- Django-8: Django Template Language (DTL)-Comments
- Django-9: Django Template Inheritance
- Django-10: Django Template Error Pages
Django-1: Learn Django Tutorial Getting Started - Outline
- 1.0: Introduction
- 1.1: Check Python & PIP
- 1.2: Create Virtual Environment
- 1.3: Install Django
- 1.4: Django Available Sub-Command
- 1.5: Create Django Project
- 1.6: The Development Server
1.0. Introduction
In this tutorial, I would like to show you the step by step process to install Django project.
1.1. Check Python & PIP
Open CMD to your project folder.
Write “python” to check the python version. Also write a simple python code to check it’s work fine. Now exit it to return this python environment.
$ python
>> print("hello")
>> exit()
To check if your system has Python installed, run this command in the command prompt:
$ python --version
To install Django, you must use a package manager like PIP, which is included in Python from version 3.4. To check if your system has PIP installed, run this command in the command prompt:
$ pip -V
Upgrade the pip version
$ python -m pip install --upgrade pip
To check the list of packages with the version currently installed.
$ python -m pip list
1.2. Create Virtual Environment
To see details about Virtual Environment visit following link, Virtual Environment
Create Virtual Environment with this command.
E:\code\django> python -m venv myenv
Activate Virtual Environment by CMD in windows OS
E:\code\django> .\myenv\Scripts\activate.bat
Activate Virtual Environment by PowerShell in windows OS
E:\code\django> .\myenv\Scripts\Activate.ps1
Activate Virtual Environment by Unix/MacOS:
source myenv/bin/activate
Create requirments text file
(myenv) E:\code\django> pip freeze > requirments.txt
Install python libraries according to the requirments text file
(myenv) E:\code\django> pip install -r requirments.txt
Deactivate Virtual Environment by CMD in windows OS
(myenv) E:\code\django> .\myenv\Scripts\deactivate.bat
1.3. Install Django
To install Django, first visit to django official site (https://www.djangoproject.com) and download django by clicking on the download section. Here, we will see various options to download The Django. Django requires pip to start installation. Pip is a package manager system which is used to install and manage packages written in python. For Python 3.4 and higher versions pip3 is used to manage packages. In this tutorial, we are installing Django in Ubuntu operating system. The complete installation process is described below. Before installing make sure pip is installed in local system.
Finally, we can install Django. Remember to install Django while you are in the virtual environment! Django is installed using pip, with this command:
(myenv) E:\code\django> python -m pip install Django
You can tell Django is installed and which version by running the following command in a shell prompt (indicated by the> prefix):
(myenv) E:\code\django> python -m django --version
Or, You can check if Django is installed by asking for its version number like this:
(myenv) E:\code\django> django-admin --version
If Django is installed, you should see the version of your installation. If it isn’t, you’ll get an error telling “No module named django”. That's it" Now you have installed Django in your new project, running in a virtual environment!
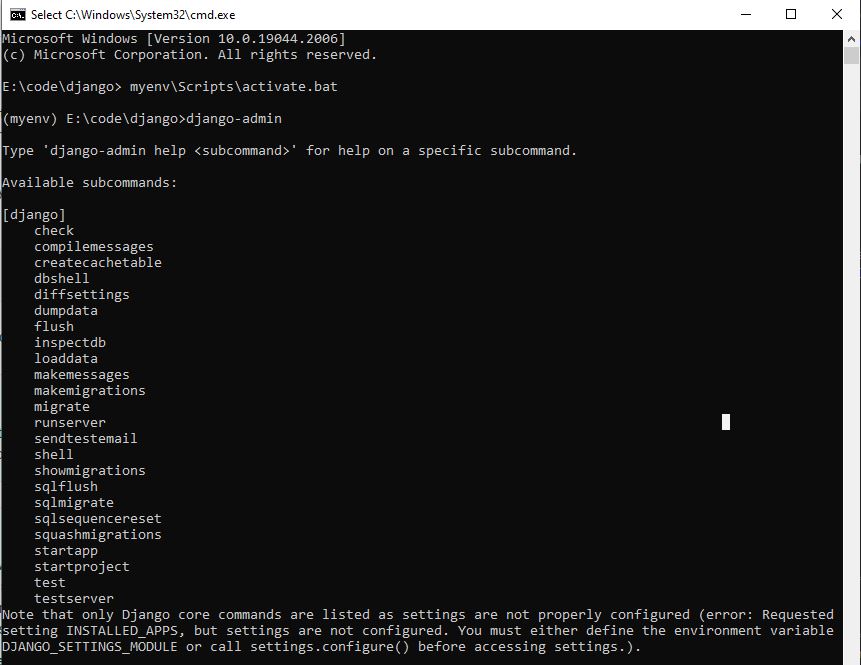
1.4. Django Available Sub-Command
Django provide several command. You can check it by the command below,
(myenv) E:\code\django> django-admin
For example, I would like to know about the startproject then run,
(myenv) E:\code\django> django-admin help startproject
1.5. Create Django Project
Once you have come up with a suitable name for your Django project, like mine: mysite, navigate to where in the file system you want to store the code (in the virtual environment), and run this command in the command prompt:
(myenv) E:\code\django> django-admin startproject mysite
Let’s look at what startproject created:
mysite/
    manage.py
    mysite/
        __init__.py
        settings.py
        urls.py
        asgi.py
        wsgi.py
These files are:
- The outer
mysite/root directory is a container for your project. Its name doesn’t matter to Django; you can rename it to anything you like. manage.py: A command-line utility that lets you interact with this Django project in various ways. You can read all the details aboutmanage.pyin django-admin and manage.py.- The inner
mysite/directory is the actual Python package for your project. Its name is the Python package name you’ll need to use to import anything inside it (e.g.mysite.urls). mysite/__init__.py: An empty file that tells Python that this directory should be considered a Python package. If you’re a Python beginner, read more about packages in the official Python docs.mysite/settings.py: Settings/configuration for this Django project. Django settings will tell you all about how settings work.mysite/urls.py: The URL declarations for this Django project; a “table of contents” of your Django-powered site. You can read more about URLs in URL dispatcher.mysite/asgi.py: An entry-point for ASGI-compatible web servers to serve your project. See How to deploy with ASGI for more details.mysite/wsgi.py: An entry-point for WSGI-compatible web servers to serve your project. See How to deploy with WSGI for more details.
1.6. The Development Server
Let’s verify your Django project works. Change into the outer mysite directory, if you haven’t already, and run the following commands:
(myenv) E:\code\django> cd mysite
(myenv) E:\code\django\mysite> python manage.py runserver
You’ll see the following output on the command line:
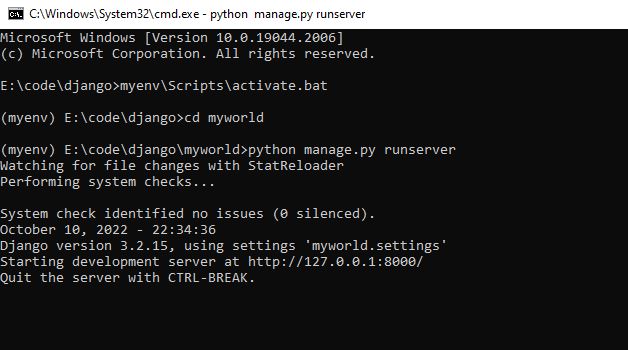
Now that the server’s running, visit http://127.0.0.1:8000/ with your web browser. You’ll see a “Congratulations!” page, with a rocket taking off. It worked!

By default, the runserver command starts the development server on the internal IP at port 8000. If you want to change the server’s port, pass it as a command-line argument. For instance, this command starts the server on port 8080:
(myenv) E:\code\django\mysite> python manage.py runserver 8080
If you want to change the server’s IP, pass it along with the port. For example, to listen on all available public IPs (which is useful if you are running Vagrant or want to show off your work on other computers on the network), use:
(myenv) E:\code\django\mysite> python manage.py runserver 0.0.0.0:8000
Full docs for the development server can be found in the runserver reference.

